
|
"The lesson will be taught in due time, Aloy. Until then, we wait." This article contains heavy spoilers. Read ahead with caution.
|
The Deathbringer is a heavyweight machine in Horizon Zero Dawn. It is not a contemporary machine; rather it is one of three machines of the ancient Chariot Class, manufactured by the robotics and technology corporation Faro Automated Solutions during the mid 21st century. As such, it was designated by FAS as the FAS-FSP5 Khopesh. One swarm of Chariot robots, including Khopeshes, went out of control, becoming the Faro Plague, and ultimately eradicated all life on Earth. Multiple Deathbringers are fought throughout the story of Horizon: Zero Dawn, serving as boss battles during several story missions, with the final one(being created by HADES) serving as the final boss of the main Story Mode of Horizon Zero Dawn.
History[]


The Schematic of an FAS-FSP5 Khopesh in the ruins of Faro Automated Solutions
Pre-Extinction[]
The FAS-FSP5 Khopesh was designed by Faro Automated Solutions and developed as part of FAS’ Chariot line of combat robots (ironically named Peacekeepers). The Khopesh was the heavy firepower unit of a swarm. A key feature was their ability to consume biomass as fuel in the event of fuel line interdiction. In addition, their OS security was considered to be virtually unbreakable.[1][2]
The Faro Plague[]
In 2064, a swarm owned by the Hartz-Timor Energy Combine became unresponsive. It started replicating at an unexpectedly high rate and defaulted to biomass conversion as its fuel supply. The swarm became known as the Faro Plague, and began to relentlessly consume the planet's biosphere, ultimately eradicating all life on Earth. With no chance of containment or regaining control of the swarm, Project Zero Dawn was implemented. This would eventually brute force the swarm’s deactivation codes and shut the robots down whilst also terraforming the ravaged Earth and re-establish life after extinction. By the time it was deactivated, the swarm and other Faro robots had completely overrun the planet and numbered in the millions.
In the New World[]
Centuries passed. Zero Dawn, managed by its governing AI GAIA, successfully terraformed the planet and re-established life. Humanity was also re-introduced to the biosphere, but only at a primitive, tribal level due to sabotage by Ted Faro deleting the APOLLO subordinate function. Meanwhile, the millions of Khopeshes and other Faro Plague robots lay buried, although a few deactivated ones were scattered on the surface. Following GAIA's self-destruction, the rogue subordinate function HADES began pursuing its objective of destroying the new biosphere. Denied the use of Zero Dawn, HADES was forced to resort to other methods, and it decided to use the Faro Plague. To do so, it manipulated the leaders of the Shadow Carja into forming a cult in its service, the Eclipse. It had the Eclipse acquire numerous Faro Plague robots, including Khopeshes, which it reactivated to bolster the cult’s strength, as it planned to use the cult as an army to reach a Zero Dawn transmission array, known to the new humans as "the Spire", sited nearby the Carja capital Meridian to reactivate the Faro Plague robots worldwide.
In accordance with HADES’ command, the Eclipse acquired several Khopeshes and other Faro Plague robots. Khopeshes were exhumed at ancient ruins such as Maker's End, and extracted from within the colossal derelict Metal Devils that had manufactured them, at sites such as the Grave-Hoard and in The Jewel. They were used by the Eclipse in their large-scale operations, such as their invasion of the Nora Sacred Land. Although some recovered Khopeshes could not be restored, the Eclipse were able to scavenge machine guns from their chassis and use them in combat. Due to their incredible firepower, the Eclipse named these ancient machine as "Deathbringers".
The Nora huntress Aloy was first told of Deathbringers when she interrogated the Oseram delver Olin, who was working, albeit unwillingly, for the Eclipse. Aloy later terminated the Eclipse’s Deathbringer retrieval operations at Maker’s End and the Grave-Hoard, destroying the Deathbringer in each instance.
Aloy next encountered Deathbringers when she infiltrated the Eclipse’s main base in The Jewel to crash the cult’s Focus network. HADES, in response to Aloy's destruction of the network, had Deathbringers fire at her in an attempt to kill her. Finally, during the Eclipse’s assault on Meridian, the Deathbringers formed the main infantry of the invasion. While Meridian's defenses took down several, they were overwhelmed by the sheer number. One Deathbringer brought the processing module containing HADES to the Spire, allowing it to transmit a reactivation signal to the rest of the Faro Plague. To protect itself while it transmitted the signal, HADES used a heavily augmented Deathbringer as a guard. Meanwhile, in various tribal lands, long-buried Deathbringers began digging their way to the surface.
Despite its sheer might, Aloy and her allies destroyed the Deathbringer, allowing Aloy to reach HADES. She purged HADES from Zero Dawn using the system’s Master Override, permanently terminating its ability to use the Zero Dawn transmission array to broadcast its reactivating signal. With that, every Faro Plague robot it had reactivated went offline, including Deathbringers, this time without any further known means of reactivation.
No active Deathbringers have been observed following the Battle of the Alight.
Appearance[]
A Deathbringer is a large and very powerful mobile weapons platform, comparable in size to the largest contemporary combat machines. Unlike Zero Dawn machines or even the other machines in the Chariot Line, Deathbringers have no resemblance to any fauna/creature or an animal of some-kind. A Deathbringer’s means of ambulation consists of six stout legs, each with a vertical piston at the end. Each leg is equipped with a stabilizer. The legs are connected radially to a circular swivel that allows the head, which is laterally wider than the span of the legs, to turn 360 degrees. The head carries several formidable weapons: a flamethrower, a grenade launcher, a gun turret, a heavy cannon turret, a swarm missile launcher and a repeater cannon turret. The head also houses heat vents, cooling rods, and the machine’s core. Tough armor plating covers the entire chassis. Two optical sensors are located centrally at the front of the head, in a vertical location, on each side of the CPU’s housing.
Behavior[]
Being an ancient war machine, a Deathbringer has no behavior other than hostility to enemy forces as defined by its master. In the case of the Faro Plague Deathbringers, enemy forces were any human forces and any machines that were not part of their swarm. In the case of Deathbringers that had been reactivated by HADES, enemy forces were any enemy of the Eclipse.
Abilities[]
While Deathbringers are incapable of any ambulation beyond short mechanical steps, their powerful array of ranged attacks compensate for this limitation. Additionally, they have a high capacity to sustain damage, comparable to the most powerful contemporary machines, and their robust armor plating prevents restraining weapons such as Ropecaster lines from gaining purchase on their chassis; thus, they cannot be tied down. Direct hits on armor plating reduces damage by 90% for projectiles and melee attacks, 70% for explosives, and 50% for fire.
Different variants of the Deathbringer encountered throughout the main quest-line carry different combinations of a total of six separate weapon systems listed below, mounted in specific locations on the Deathbringer's upper body as outlined in the table here, including heavy machine guns, missile racks, ballistic cannons, grenade launchers and flamethrowers. None of the variants come equipped with all six weaponized Components at once.
| Quest Appearance | Top Left | Top Right | Left Side | Right Side | Front | Rear |
|---|---|---|---|---|---|---|
| Maker's End | ― | ― | Repeater Cannon | Repeater Cannon | Flamethrower | Gun Turret |
| The Gravehoard | ― | Swarm Launcher | Flamethrower | Flamethrower | Gun Turret | ― |
| To Curse the Darkness (ver. 1) | ― | ― | Repeater Cannon | Repeater Cannon | Gun Turret | ― |
| To Curse the Darkness (ver. 2) | Swarm Launcher | Swarm Launcher | Flamethrower | Flamethrower | Gun Turret | ― |
| The Heart of the Nora | ― | ― | Repeater Cannon | Repeater Cannon | Flamethrower | ― |
| The Face of Extinction | Swarm Launcher | Swarm Launcher | Flamethrower | Flamethrower | Gun Turret | Gun Turret |
| The Face of Extinction (HADES) | Heavy Cannon Turret | Heavy Cannon Turret | Gun Turret | Gun Turret | Grenade Launcher | Gun Turret |
Weaknesses[]
Like their fellow Chariot machine, the Corruptor, centuries of burial underground have given them two significant weaknesses: They are particularly vulnerable to weapons that utilize fire, and they are prone to overheating. When they overheat, they open five Heat Vents and expose six Cooling Rods, which inflict significant damage when hit and accelerate the rate at which heat builds up by accumulating constant passive increases in Overheat severity once destroyed. Destroying a total of four Heat Vents or Cooling Rods exposes its internal Core during subsequent overheating cycles. Additionally, they expose six leg Stabilizers when overheated or during Heavy Weapon attacks. Destroying a Stabilizer temporarily incapacitates a Deathbringer, and destroying all six of them causes the machine to stagger when attempting to perform Heavy Weapon attacks. All mounted weapons can be removed or destroyed disabling its corresponding attacks entirely, including a heavy machine gun which can be picked up and wielded against the Deathbringer itself.
Attacks[]
| Attack Name | Damage Type | Primary Damage | Secondary Damage | Trigger Range | Description |
|---|---|---|---|---|---|
| Heavy Cannon Shot | Explosion | 200 | - | 20m - 100m | Targets enemy with laser guidance, then fires heavy round at enemy |
| Repeater Cannon Burst | Explosion | 40 per hit | - | 15m - 60m | Repeated cannon shot at enemy; stabilizers are exposed |
| Rocket Barrage | Explosion | 50 | - | 12m - 100m | Barrage of missiles fired at enemy; stabilizers are exposed |
| Rocket Salvo | Explosion | 50 | - | 12m - 100m | Single salvo of missiles fired at enemy |
| Swarm Missile Burst | Explosion | 100/145[3] | - | 25m - 100m | Explosive volley of 3 projectiles fired at enemy |
| Flamethrower Burst | 60 per second | - | 0m - 20m | Flamethrower blast over wide area at enemy | |
| Grenade Launcher Shot | 60 | 25 per second | 10m - 30m | Grenades fired at enemy | |
| Foot Stomp | Melee | 200 | 160 | 9m | Stamps at enemy at close range |
| Gun Turret Burst | Projectile | 45 per hit | - | 5m - 80m | Shoots at enemy with gun turret |
Components[]
| Component | Image | Information | Weakness | Strength |
|---|---|---|---|---|
| Body | 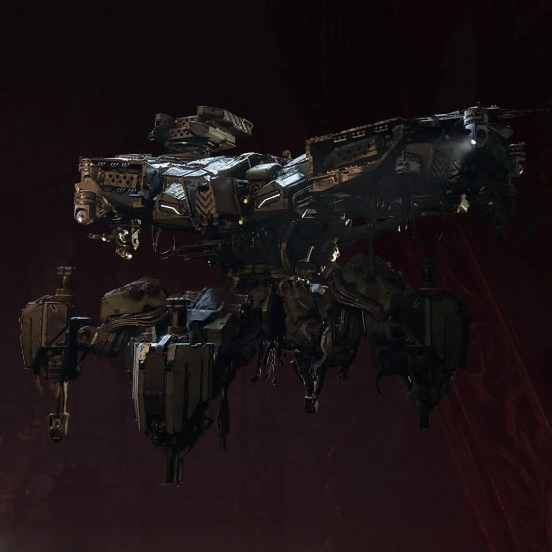
|
Hard outer casing to protect synthetic muscle and operational systems. | ||
| Repeater Cannon Turret | 
|
Destroying this component disables the Repeater Cannon attacks. | All | None |
| Cooling Rods | 
|
This component is exposed when the machine overheats. Destroying this component causes high damage and the machine to overheat faster. | All | None |
| Core | 
|
This component is exposed when the machine overheats. Hitting it when exposed causes massive damage. | All | None |
| Flame Thrower | 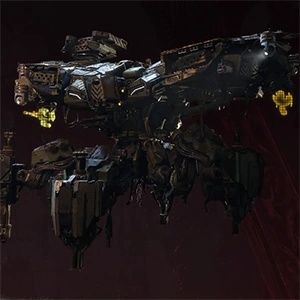
|
Destroying this component disables the Flame Thrower attack. | All | None |
| Grenade Launcher | 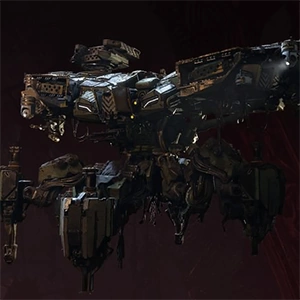
|
Destroying this component disables the Grenade Launcher attack. | All | None |
| Heat Vents | 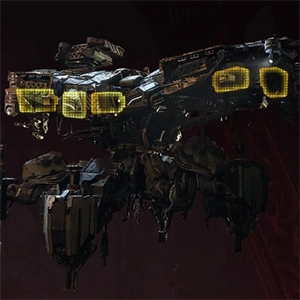
|
This component is exposed when the machine overheats. Destroying this component causes high damage and the machine to overheat faster. | All | None |
| Gun Turret | 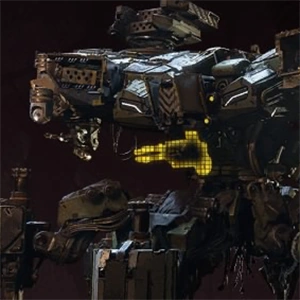
|
Hitting this component deals greater damage to the machine. This heavy machine gun can be picked up and used after it has been detached. | None | |
| Swarm Launcher | 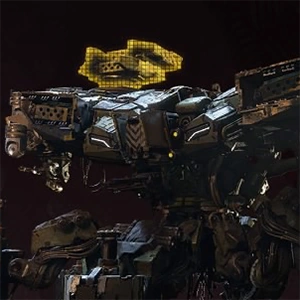
|
Destroying these components disables the Swarm Cannon attack. | All | None |
| Stabilizer | 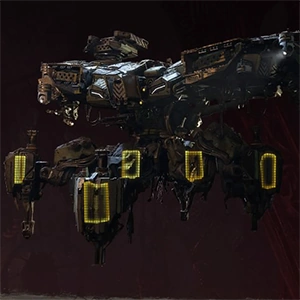
|
Hitting this component deals greater damage to the machine and cause the machine to fall on its side. | All | None |
| Heavy Cannon Turret | 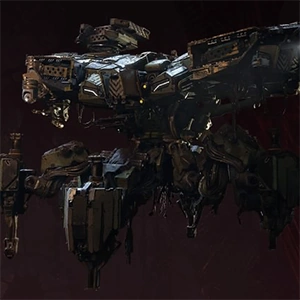
|
Destroying this component disables the Cannon Turret attack. | All | None |
Loot[]

Trivia[]
- The original name of the Deathbringer, "Khopesh", is a reference to an Ancient Egyptian sickle sword. This is a clear demonstration of its intended purpose as a mainstay weapons platform.
- According to the "The Bad News" cutscene there were at least 697,000 Deathbringers produced by the Faro Plague.
- The Deathbringer's design seems to be inspired by the Hunter-Killer Centurion from The Terminator film series.
- During development, Deathbringers were referred to as Warbots.[4]
- Deathbringers are one of the few machines from Horizon: Zero Dawn that did not reappear in Horizon: Forbidden West. Many inactive Deathbringers can be found throughout the Forbidden West, particularly in No Man's Land, but no active ones.
Gallery[]
")
")
")
")
")
")
")
")
")
")
")
")
")
")
")
References[]
- ↑ FAS-FSP5 Khopesh (Datapoint)
- ↑ Entangled Waveforms
- ↑ The Deathbringer encountered during The Face of Extinction deals slightly higher damage with its Swarm Missle Burst.
- ↑ https://youtu.be/4FAXv2H-VUA, 6:54
| Machines | |
|---|---|
| Horizon Zero Dawn | |
| Acquisition Class | Broadhead - Charger - Fireclaw - Frostclaw - Glinthawk - Grazer - Lancehorn - Rockbreaker - Scrapper - Snapmaw - Strider - Trampler |
| Chariot Class | Corruptor - Deathbringer - Metal Devil |
| Combat Class | Ravager - Sawtooth - Scorcher - Stalker - Stormbird - Thunderjaw |
| Communication Class | Tallneck |
| Recon Class | Longleg - Watcher (Redeye Watcher) |
| Transport Class | Behemoth - Bellowback - Shell-Walker |
| Unknown Class | Control Tower |
| Horizon Forbidden West | |
| Acquisition Class | Bilegut - Bristleback - Clamberjaw - Fanghorn - Plowhorn - Scrounger - Spikesnout - Stingspawn - Sunwing - Tideripper - Waterwing - Widemaw |
| Combat Class | Clawstrider - Dreadwing - Grimhorn - Shellsnapper - Slaughterspine - Slitherfang - Specter - Specter Prime - Tremortusk |
| Recon Class | Burrower - Skydrifter |
| Transport Class | Leaplasher - Rollerback |
| Unknown Class | Defense Drone |